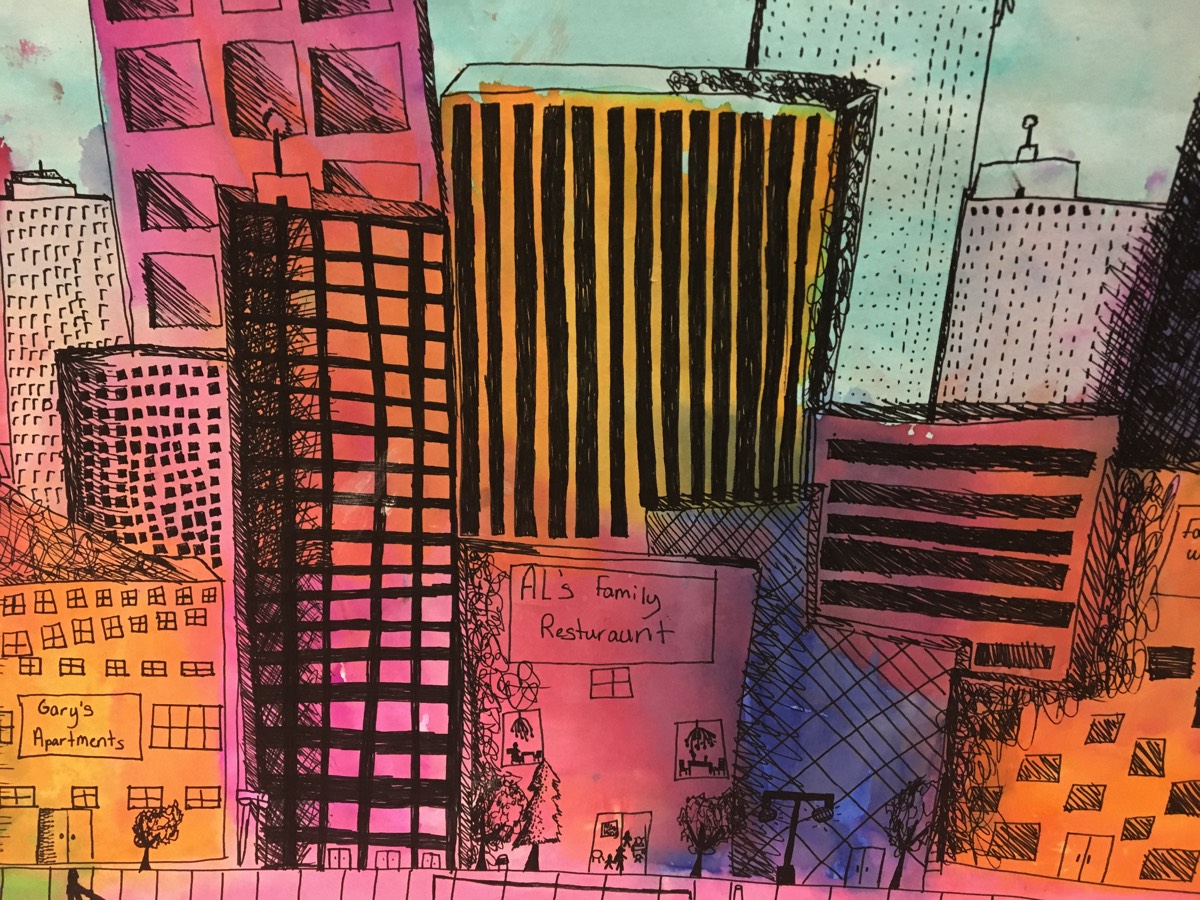
Cityscape
Project Description
Tissue Paper Bleeding Art is a creative and vibrant art assignment that encourages students to explore the captivating world of color blending and texture using tissue paper as their primary medium. This project combines elements of painting, collage, and experimentation to foster artistic expression and unleash the imaginative potential of participants.
Objectives
The primary objective of this assignment is to introduce students to the concept of color diffusion and its artistic applications while allowing them to develop their creative thinking and technical skills.
Materials Needed:
Tissue paper in various colors (water-based ink or washable markers also work)
White canvas or heavyweight paper
Paintbrushes and water cups
Plastic sheeting or disposable tablecloths to protect surfaces
Water spray bottles
Pencils and erasers (optional for sketching)
Craft glue and scissors (optional for collage elements)
Instructions:
Introduction to Color Bleeding: Begin the assignment by discussing the concept of color bleeding. Explain how colors can blend and spread when they come into contact with water.
Inspiration and Theme: Discuss possible themes or concepts for the artwork. Themes could range from abstract color exploration to more specific topics such as emotions, nature, or personal experiences.
Design and Sketch: If desired, have students create a rough sketch or plan for their artwork on the canvas or paper. This step is optional but can help students visualize their ideas.
Tissue Paper Preparation: Distribute tissue paper sheets to students, or let them cut and tear pieces from larger sheets. Encourage them to choose a variety of colors that align with their artistic vision.
Layering and Arrangement: Guide students in arranging the tissue paper pieces on the canvas or paper. They can layer and overlap the tissue paper to create different effects. Emphasize that they can mix colors to create new shades.
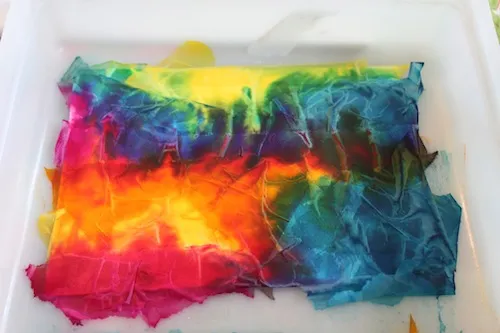
Water Application: Instruct students to lightly spray or dab water onto the tissue paper using paintbrushes, water spray bottles, or wet sponges. The moisture will cause the colors to bleed and blend together. Experimentation is encouraged to achieve the desired effect.
Drying Process: Allow the artwork to dry completely. This may take some time, so it's essential to exercise patience. Once dry, gently remove any excess tissue paper that hasn't adhered to the canvas or paper.
Finishing Touches: If desired, students can add additional details, outlines, or collage elements using craft glue and scissors. These can enhance the overall composition.
Presentation: Have students present their tissue paper bleeding art to the class, explaining their inspiration and creative process. Encourage a discussion about the use of color, texture, and the emotions evoked by their artwork.
Gallery Display: Consider displaying the completed artworks in a designated area of the classroom or school, creating a colorful and visually stimulating gallery for all to enjoy.
Learning Objectives
Understanding Color Theory:
Learn and apply basic principles of color theory, such as color blending, complementary colors, and color harmonies.
Exploring Texture:
Experiment with creating texture through the layering and manipulation of tissue paper.
Developing Creativity:
Encourage creative thinking by exploring personal themes, ideas, or emotions through the medium of tissue paper art.
Fine Motor Skills:
Develop fine motor skills by cutting, tearing, and arranging tissue paper pieces precisely.
Problem-Solving:
Adapt and make artistic decisions as the tissue paper bleeds and interacts with water.
Expression and Communication:
Use the artwork as a means of self-expression, conveying emotions, moods, or messages through color, texture, and composition.
Art Appreciation:
Understand how different techniques and mediums can evoke different emotional responses in viewers.
Art History and Context:
Understand how tissue paper bleeding art fits into the broader context of art history and contemporary art practices.
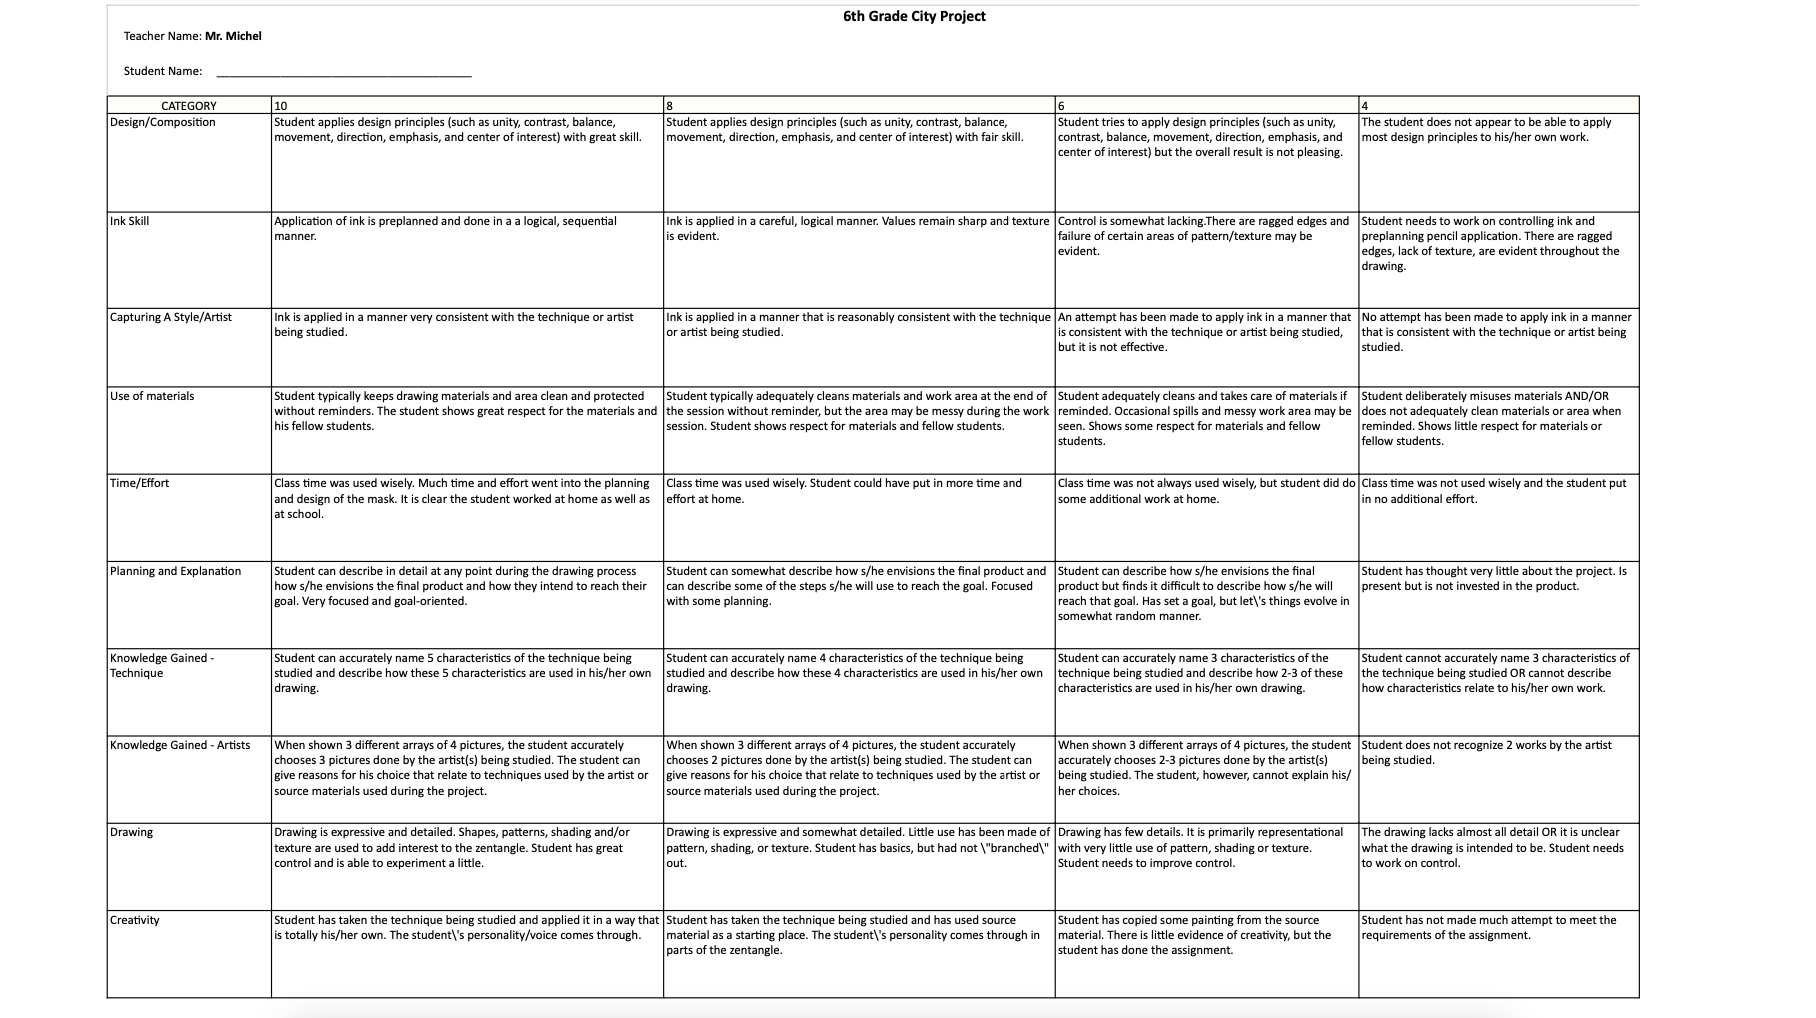
Rubric
Rubrics have become popular with teachers as a means of communicating expectations for an assignment, providing focused feedback on works in progress, and grading final products. A rubric is a document that articulates the expectations for an assignment by listing the criteria, or what counts, and describing levels of quality from excellent to poor.
Element of Art
Space:
An element of art by which positive and negative areas are defined or a sense of depth achieved in a work of art.


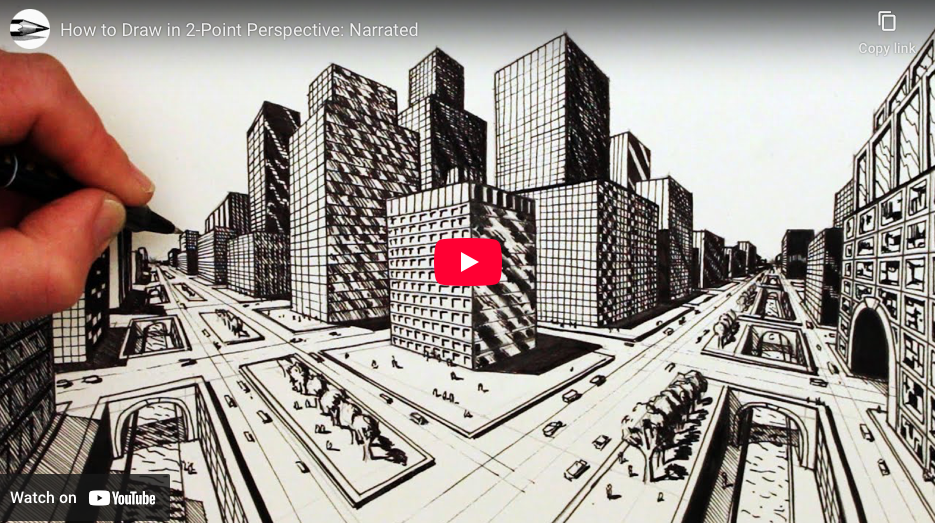
Artist: Filippo Brunelleschi
Filippo Brunelleschi was an Italian designer and a key figure in architecture, recognized to be the first modern engineer, planner and sole construction supervisor. He was one of the founding fathers of the Renaissance. He is generally well known for developing a technique for linear perspective in art and for building the dome of the Florence Cathedral.

Techniques
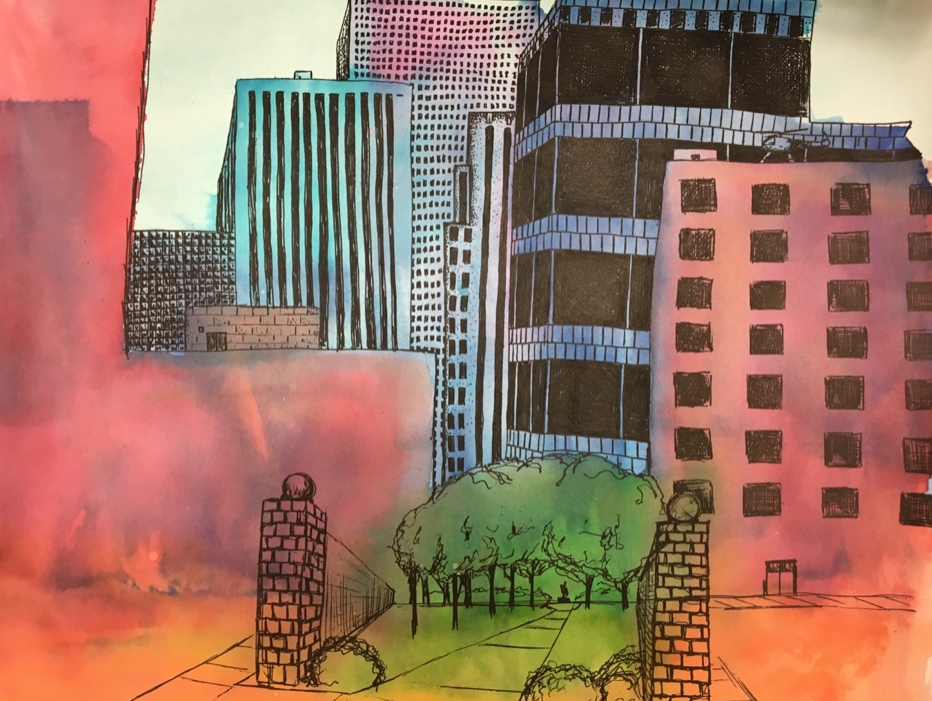
Tissue Paper (Background) Techniques:
Color Blending
Layer warm or cool tissue paper colors and apply water to let them bleed together naturally, creating gradients like sunset or night skies.
Overlapping Shapes
Overlap tissue shapes to build depth and mix new colors (e.g., blue over red creates purple when wet).
Wet-on-Wet Application
Wet the paper lightly first, then place tissue on top and re-wet to encourage softer, more blended edges.
Radial or Directional Layout
Arrange tissue pieces in a circular or diagonal pattern to mimic the motion of light or clouds.
Salt or Alcohol Texture (Optional, Advanced)
While the tissue is wet, sprinkle salt or drop rubbing alcohol to create a textured or starry effect (only on appropriate surfaces).
City Silhouette (Foreground) Techniques:
Silhouette Drawing
Use black ink or Sharpie to draw bold building shapes with strong outlines and flat fill.
Cut Paper Silhouettes
Cut buildings from black construction paper to get clean, crisp edges, then glue onto the background.
Negative Space Windows
Use a white gel pen or leave cut-out spaces for windows, doors, or lighted signs to break up solid black areas.
Perspective Variation
Vary building height and angle to create a sense of depth and skyline perspective.
Layered Silhouettes
Add a second row of smaller or lighter (gray) buildings behind the first for extra depth.
Project Demonstration

Examples

“Creativity takes courage.”
Cloverleaf Middle School
Follow Us
